OCCASIONAL INTERMITTENT ASSISTANCE – NOT SPEED DEPENDENT
CAUSE:
Silent loss of assistance is almost always due to an issue with sensor installation or the sprocket – either because the sensor is not fixed correctly / sufficiently firmly or because the sprocket itself is moving side to side on the bike – for example, if you find assistance goes off when you are pressing down hard on the pedals, such as on a steep hill, that usually indicates that the rear wheel and/or sprocket/cassette are not securely tightened.
If assistance was working, then has become intermittent this is because something has changed. Just realigning the sensor will not solve the problem if the mounting itself is no longer firm or if your sprocket is moving sideways relative to the sensor head. A sign of movement (whether the sensor head or the sprocket) is when the intermittency is temporarily cured by unplugging and re-plugging the bottle or sensor on the bike. If your sensor moved whilst you were riding and then came back to the original position the calibration may now be wrong, which is why it requires a reset.
FIX:
IMPORTANT:
If you have an earlier Cytronex kit where there is a sensor connector, you can complete a sensor reset by undoing the connector with the bottle off, reconnecting the sensor and then reconnect your bottle and follow our advice below.
If your sensor has stopped working correctly after a prolonged period then we do not recommend repeated re-adjustment – this is counter productive. Instead, please do the following only in the order shown:
1. Rear Wheel and Cassette:
The first thing to check with an intermittent issue is that the sprocket is not moving sideways in use – this may seem unlikely but in fact pressing down hard on the pedals, such as when climbing a hill, can easily exert sufficient force to move the sprocket from side to side if the rear wheel is not sufficiently tight, or the cassette is not tightly fixed with its locking ring, or the bearings are worn. For example, if you can see the cassette/sprocket moving when freewheeling in a bicycle stand with the rear wheel suspended off the ground – this is a good indication that freehub bearings need replacement.
Please note – in cases of silent intermittent assistance we strongly recommend cycling on the road in Pedal Setup Mode – if blue is indicated during forward pedaling when pushing down hard on the pedals (e.g. when climbing a hill) this is a sure sign that the sprocket is moving for one of the reasons stated above. Whilst we recommend the following steps also, pedal force is very unlikely indeed to move the sensor bracket on the chain stay.
2. Sensor Attachment:
Once you have checked the bicycle components as above, check the sensor and bracket next. If you, or a bicycle shop, have removed the rear wheel without first dipping the spring loaded head as per the manual, then this may have knocked the sensor out of position and it may now need tightening. The new Cytronex sensor bracket is capable of fixing firmly to almost any shape of chain stay, so as long as the zip ties are firmly fixed as below this is unlikely to have moved.
Check that the bracket is firmly fixed – zip ties should have been pulled tight with pliers when fitted, if they are now loose then they will need to be re-tightened or replaced. The new sensor bracket has an adhesive pad on the inside of the quarter pipe fitting to the chain stay – once fitted firmly it should not move, so once the zip ties have been checked then move on to the sensor adjustment with the two screws. If you have the old type of sensor bracket with two slotted metal parts and your chain stay tapers, then the zip ties might be slipping – a double sided sticky tape between the plastic bracket and the chain stay can help prevent movement. Also see below if you have the old sensor bracket and the inside profile of your chain stay is flat.
Make sure the zip tie heads are not facing outwards – intermittent assistance can also be caused by the rider’s heel occasionally hitting zip tie heads – these should be rotated under the chain stay out of the way, as per the Fitting Instructions.
Where readjustment and tightening only work temporarily this means there is very likely movement in the bike components, making sure the rear wheel is firmly fixed is essential, but if that does not cure the problem then we recommend asking your local bike shop (or the Cytronex workshop) to check that the cassette is tightly mounted and whether the freehub bearings need replacement.
3. Check sensor alignment with the 3 photos and re-adjust only if necessary:
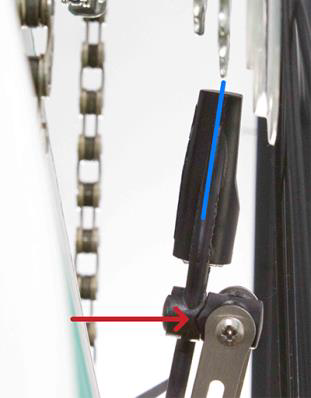
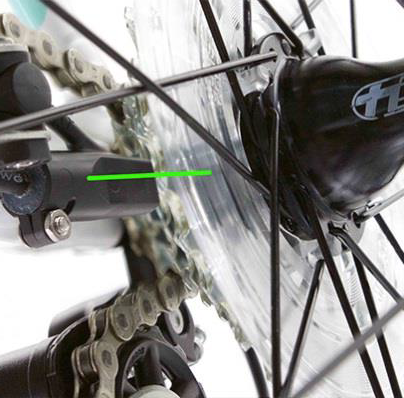
Please see the 3 different views below that show correct sensor alignment. The most common issue we see is that the sprocket teeth are not centrally aligned to the end of the sensor head as shown by the blue line – this can only be viewed from directly above. Please note that if you need us to check, we can only do so with the exact same 3 photo views as below and often when taking these photos, the problem will become immediately apparent and will not require our help.
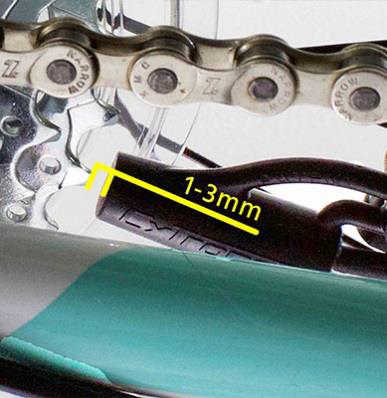
Also if assistance remains intermittent this is very likely due to play in the bicycle components as described above and depending on how much movement there is, the problem can often be eliminated (in the short term) by moving the sensor closer – see the photo below with the yellow lines.
Correct sensor alignment:
Once adjusted as shown in these 3 photos both screws should be carefully tightened to ensure a firm fixing, taking care not to round the screw heads. To test your sensor alignment, use Pedal Setup Mode –
- If you have the one-way button (green, blue and red LEDs) engage this by holding down the Boost Button for at least 4 seconds until the Bottle LED turns blue and then release the button.
- If you have the two-way button (amber, blue, green, red and white LEDs) then you can enter Pedal Setup Mode by holding the left side of the Boost Button down for 4 seconds until a blue and white LED shows on the Boost Button (the Bottle LED will also go Blue) and then release the button.
When you pedal forwards in Pedal Setup Mode the bottle LED should stay green, if you have the two-way Boost Button then this should also stay green during forward pedaling. Intermittent problems are almost always caused by movement (e.g. sideways movement of the sprocket) and are best tested by riding in Pedal Setup Mode on the road because any movement due to loading / pressing hard on pedals on hills will become apparent (the bottle LED will show blue if Cytronex is not receiving a correct forward pedaling signal, as will the button if it is a 2-way button). When finished, exit Pedal Setup Mode with a single momentary press of the Boost Button.
Please note that a constant red LED when using Pedal Setup Mode shows that the pedals are being moved at a speed representing more than the maximum speed for assistance (in this case, the sensor is working however). With the two-way Boost Button even if the bottle LED goes Red for this reason, the Boost Button will show a Green LED if the sensor is correctly positioned. If you are not pedalling very fast when you see a red bottle LED in Pedal Setup Mode then please see “Assistance fades out silently at low speed”
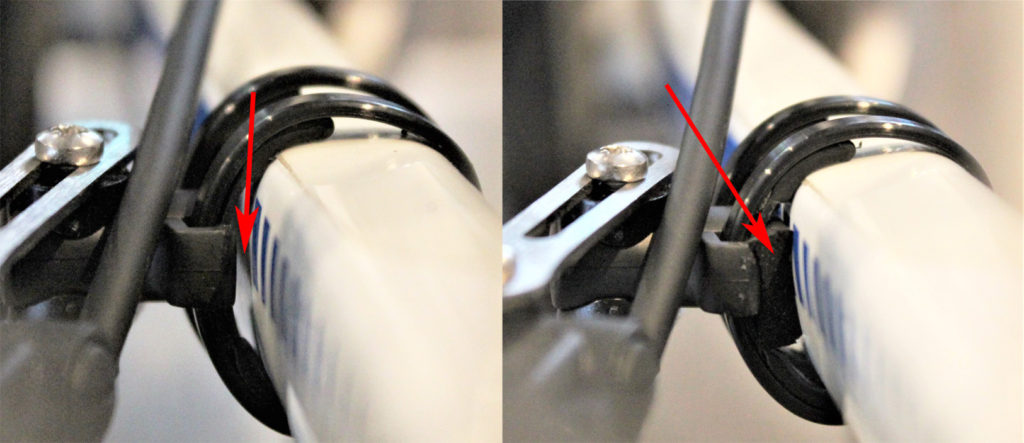
Chain Stay Profile – applies to original bracket with 2 slotted metal rails only:
With the original sensor bracket only – movement in the sensor can also happen in cases where the inside of the chain stay to which the sensor bracket is fixed has a flat profile. This can result in a gap between the middle of the plastic sensor bracket and the bicycle chain stay – even a small gap here can allow the sensor to move in use so we recommend filling any such gap with a rubber shim (just under the middle where the gap is as shown by the red arrows) and tightening zip ties again with pliers to be sure the bracket is fixed solidly.